> ## Documentation Index
> Fetch the complete documentation index at: https://apidoc.cufinder.io/llms.txt
> Use this file to discover all available pages before exploring further.

# Setup Guide for ChatGPT Web

> Connect CUFinder MCP with ChatGPT in minutes. Access 1B+ contacts and 85M+ companies for lead generation and data enrichment directly in your AI conversations.

## Note on ChatGPT support

Full support for MCP client access in connectors and tools is currently in **beta** in ChatGPT. At the moment, it's only available in **Developer mode** for **Pro and Plus accounts on the web.**

While it's in beta, we recommend being as **explicit and precise** as possible in your prompts. For example:

<div className="custom-list">
  * Mention the **CUFinder MCP connector** directly.
  * Specify the **tool or endpoint** to use.
  * Indicate which **fields to pull** and how to **sort the results.**
  * Excplicitly ask ChatGPT **not to use the web search.**
</div>

For the latest details, see the official <a target="_blank" href="https://developers.openai.com/api/docs/guides/developer-mode" className="text-primary"> ChatGPT Developer Mode docs </a>

## Setup guide

Follow these steps to add CUFinder MCP server to ChatGPT Web:

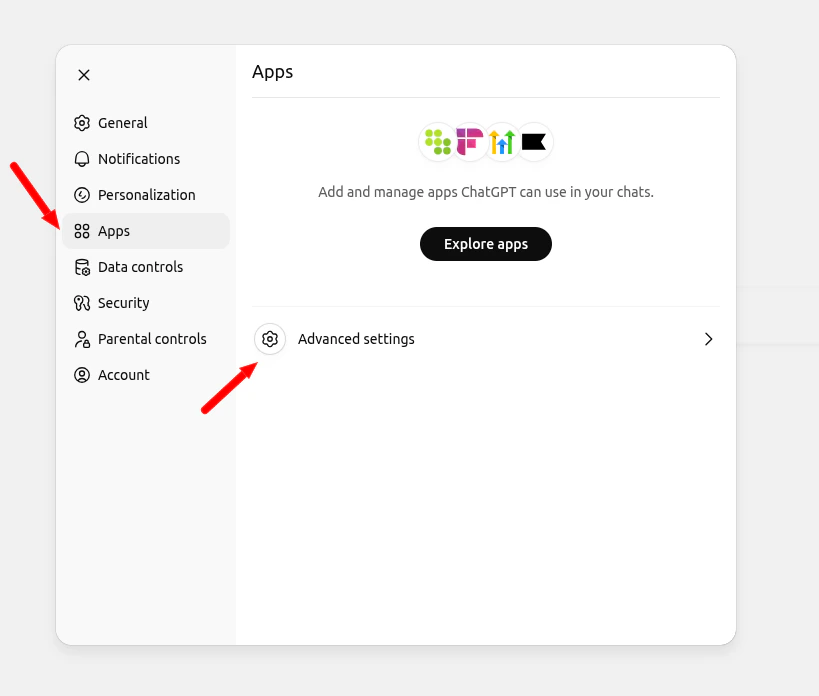
1. Go to Settings >  <a target="_blank" href="https://chatgpt.com/#settings/Connectors" className="text-primary"> Apps </a> > Advanced settings

<Frame>
  <img src="https://mintcdn.com/cufinder/7J91rDocShm-i9_Z/images/mcp/11.png?fit=max&auto=format&n=7J91rDocShm-i9_Z&q=85&s=71f97d85fd66cddd587b9e01e2259c15" alt="mcp-11" width="819" height="696" data-path="images/mcp/11.png" />
</Frame>

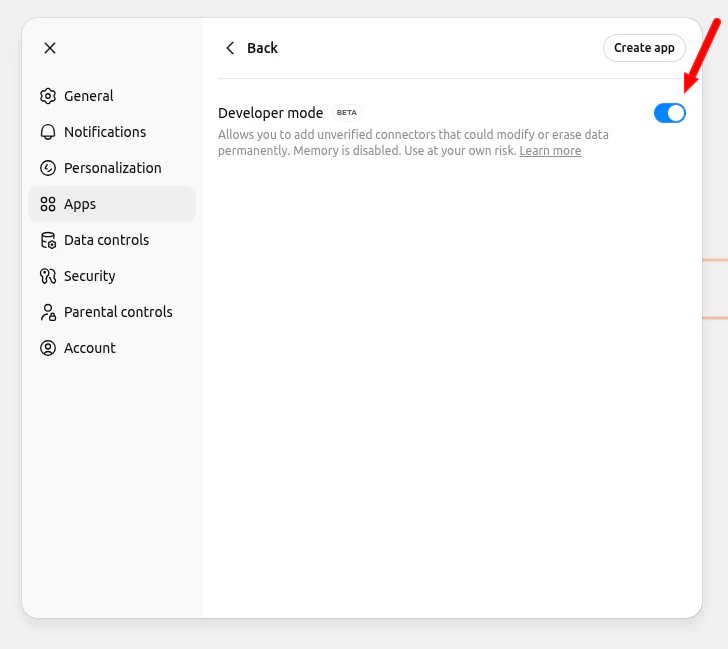
2. Enable the "Developer mode".

<Frame>
  <img src="https://mintcdn.com/cufinder/7J91rDocShm-i9_Z/images/mcp/12.png?fit=max&auto=format&n=7J91rDocShm-i9_Z&q=85&s=6c4c769cc1d62fec050bcf6a03382cf5" alt="mcp-12" width="728" height="649" data-path="images/mcp/12.png" />
</Frame>

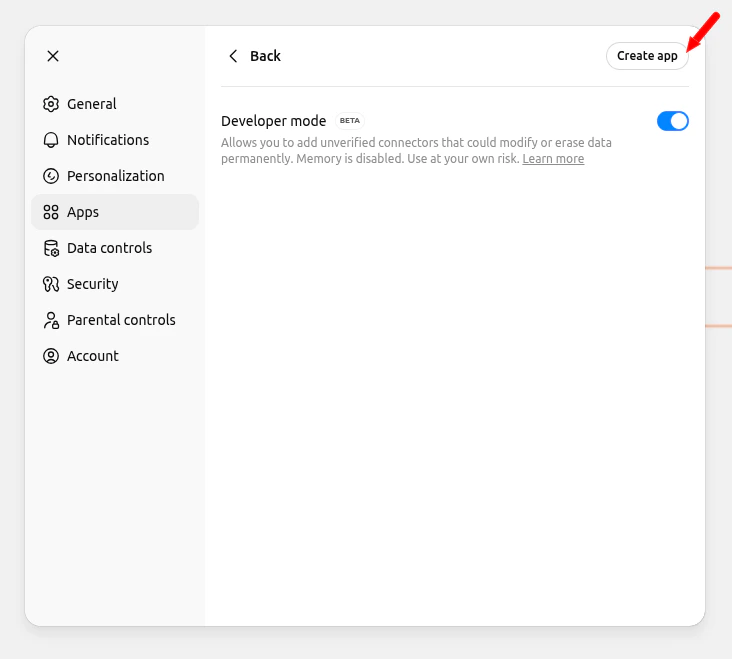
3. Click the "Create app" button.

<Frame>
  <img src="https://mintcdn.com/cufinder/7J91rDocShm-i9_Z/images/mcp/13.png?fit=max&auto=format&n=7J91rDocShm-i9_Z&q=85&s=9f32d3380044faaec29fee69a7db5499" alt="mcp-13" width="732" height="659" data-path="images/mcp/13.png" />
</Frame>

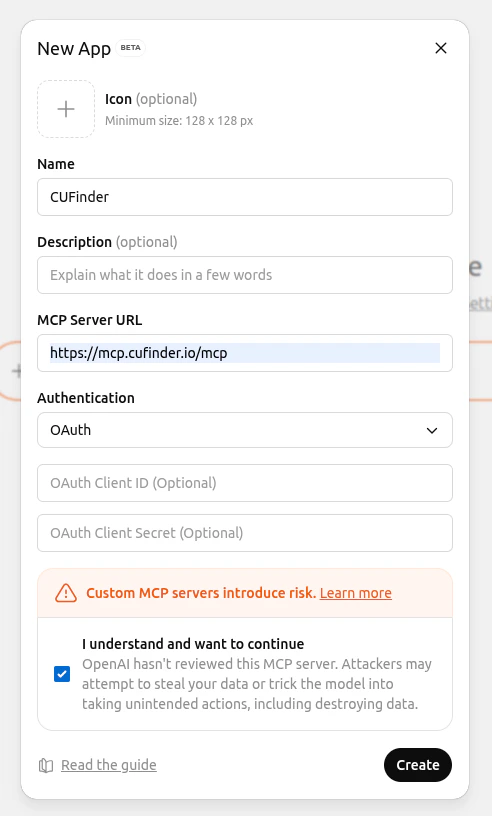
4. Fill in the new Connector details:

<div className="custom-list pl-8">
  * MCP Server URL: <span className="pointer-events-none text-primary not-prose font-semibold"> [https://mcp.cufinder.io/mcp](https://mcp.cufinder.io/mcp) </span>
  * Authentication: OAuth
</div>

Select the option “I trust this application” and click the "Create" button.

<Frame>
  <img src="https://mintcdn.com/cufinder/7J91rDocShm-i9_Z/images/mcp/14.png?fit=max&auto=format&n=7J91rDocShm-i9_Z&q=85&s=7dad2324ce5d504be11a126696264d88" alt="mcp-14" width="492" height="816" data-path="images/mcp/14.png" />
</Frame>

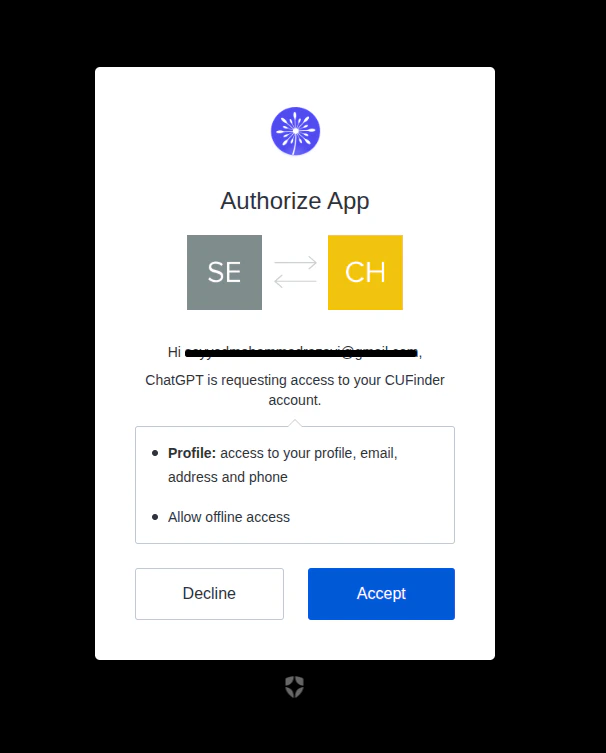
5. In the opened page, enter your CUFinder dashboard username and password, then click Connect.

6. Then, click Yes to confirm that Chatgpt is requesting access to your CUFinder account.
<Frame>
  <img src="https://mintcdn.com/cufinder/7J91rDocShm-i9_Z/images/mcp/15.png?fit=max&auto=format&n=7J91rDocShm-i9_Z&q=85&s=4e986851a4762ed8948a72fdf23e01b7" alt="mcp-15" width="606" height="753" data-path="images/mcp/15.png" />
</Frame>

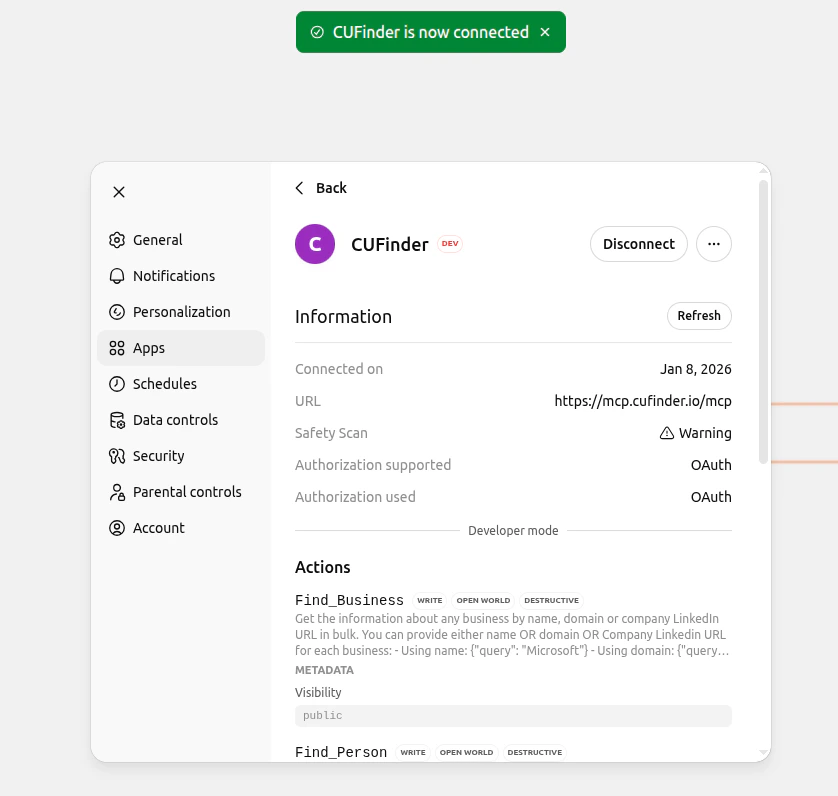
7. Check that the apps in ChatGPT is successfully connected.
<Frame>
  <img src="https://mintcdn.com/cufinder/7J91rDocShm-i9_Z/images/mcp/16.png?fit=max&auto=format&n=7J91rDocShm-i9_Z&q=85&s=134dd985b8bbe3936a5ec6cdb8a02fc2" alt="mcp-16" width="838" height="796" data-path="images/mcp/16.png" />
</Frame>

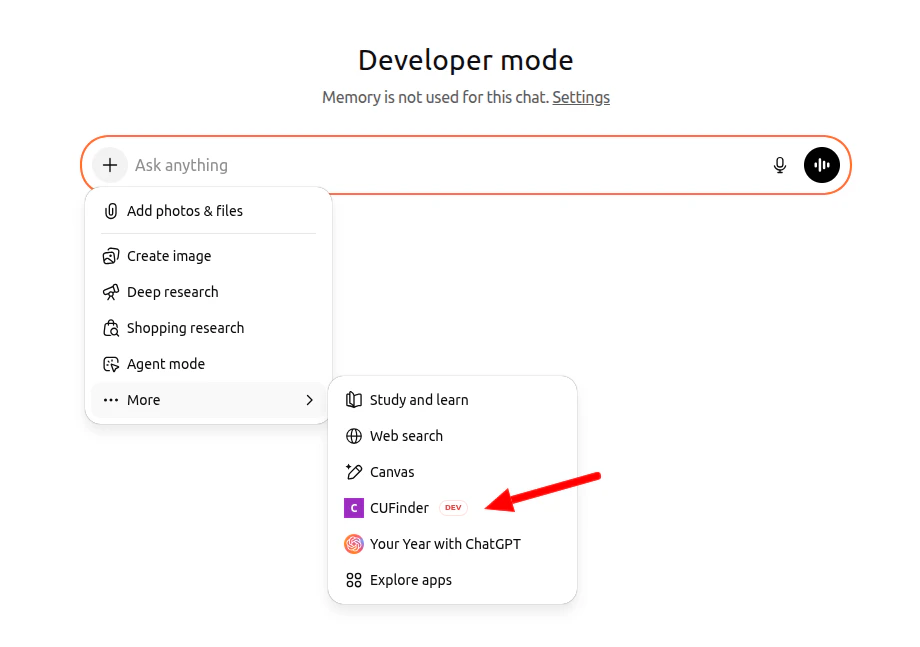
8. Activate the CUFinder connector in the chat before starting the query:
<div className="custom-list pl-8">
  * Click on the "+" sign → "More" → "CUFinder”
</div>

<Frame>
  <img src="https://mintcdn.com/cufinder/7J91rDocShm-i9_Z/images/mcp/17.png?fit=max&auto=format&n=7J91rDocShm-i9_Z&q=85&s=cc0095a7c0114c7d1841d32a20084ee1" alt="mcp-17" width="920" height="647" data-path="images/mcp/17.png" />
</Frame>